Article
Source
Doc
| Category | Documentation |
|---|---|
| Type | Doc |
| Last Modified | 17 October 2025 |
| Location | Processes > Tech Fixes |
WordPress Tech Fixes Guide
From FAQ-Off, the Calibre9 knowledge base
| Introduction | |
This Guide | This guide is maintained by Lachlan “Lachlan ‘Cowie’ Cowie” Cowie. If you discover any errors, out-of-date information, or would like extra information added – please leave a comment or send me a message on Slack. |
Overview | This is our basic guide to technical SEO fixes. The purpose of this guide is to teach you everything you need to know to complete common fixes in WordPress. |
Purpose | The purpose of completing tech fixes on a client’s site is to remove any blockers that might confuse a search engine, preventing it from understanding or indexing our client’s content correctly. |
Research | SEO is an incredibly complex and broad field. We work with a much wider array of softwares and industries than most actual Web Developers. Don’t be embarrassed or afraid to research how to make a simple fix in a particular CMS. Experienced people need to double check often (particularly when using software for the first time). A good place to start is the official documentation (and Google): |
General Tips | My major tips for completing tech fixes on CMSs are as follows:
|
| WordPress | |
Overview | WordPress is by far the most popular CMS in the world (used by 43% of websites at time of writing). It is free to use and can be installed on any web server that the client has access to. WordPress is quite lightweight and feature-sparse, but is popular because it has a large library of free “plugins” which extend the functionality of the software in any direction that the user desires. One of the most popular plugins, WooCommerce, turns WordPress into a complete Ecommerce CMS with full product management and payment features. Another popular plugin, Yoast, adds a range of basic SEO features to the CMS, including Titles, meta descriptions, sitemaps and canonical tags. We have tended to find that WordPress is favoured by developers when building simple service-based websites, but can be used for any kind of site. |
Logging In | Each WordPress installation handles accounts and permissions separately from other WordPress sites. The username and password should be available in 1Password. The login URL is also usually available in 1password. By default it will be at /wp-admin/ but some sites use custom login URLs as an additional security measure.
|
Plugins | WordPress has hundreds of plugins that can add all kinds of functionality to the sites. These are the ones that we and our clients use most often: SEO Plugins
Code Injection
Redirections
Bulk Meta Uploads
History Backups
Page Speed/Image Optimization
Caching
Theme/Styling Plugins
Ecommerce
Contact Forms
Security
To install a plugin, go to: Plugins → Add New Plugin → then search for the correct plugin → Install → Activate
|
History | Unlike other CMSs, WordPress does not feature any history of changes by default. We strongly recommend installing a history plugin to protect yourself and the client (sometimes WebDevelopers attempt to blame us for their own mistakes on the site). Our favoured plugin is Simple History. Once installed, it can be accessed by clicking on the menu item in the sidebar. 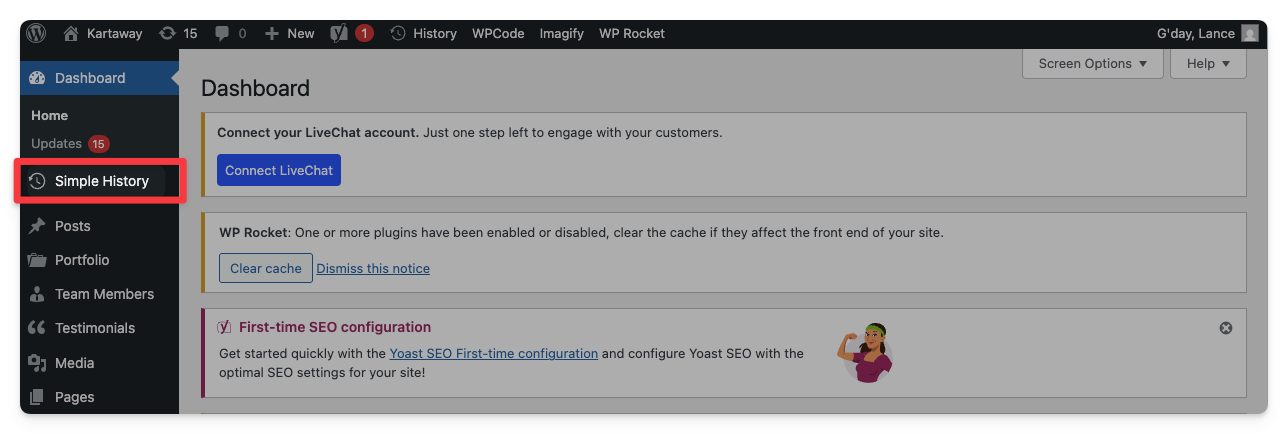 |
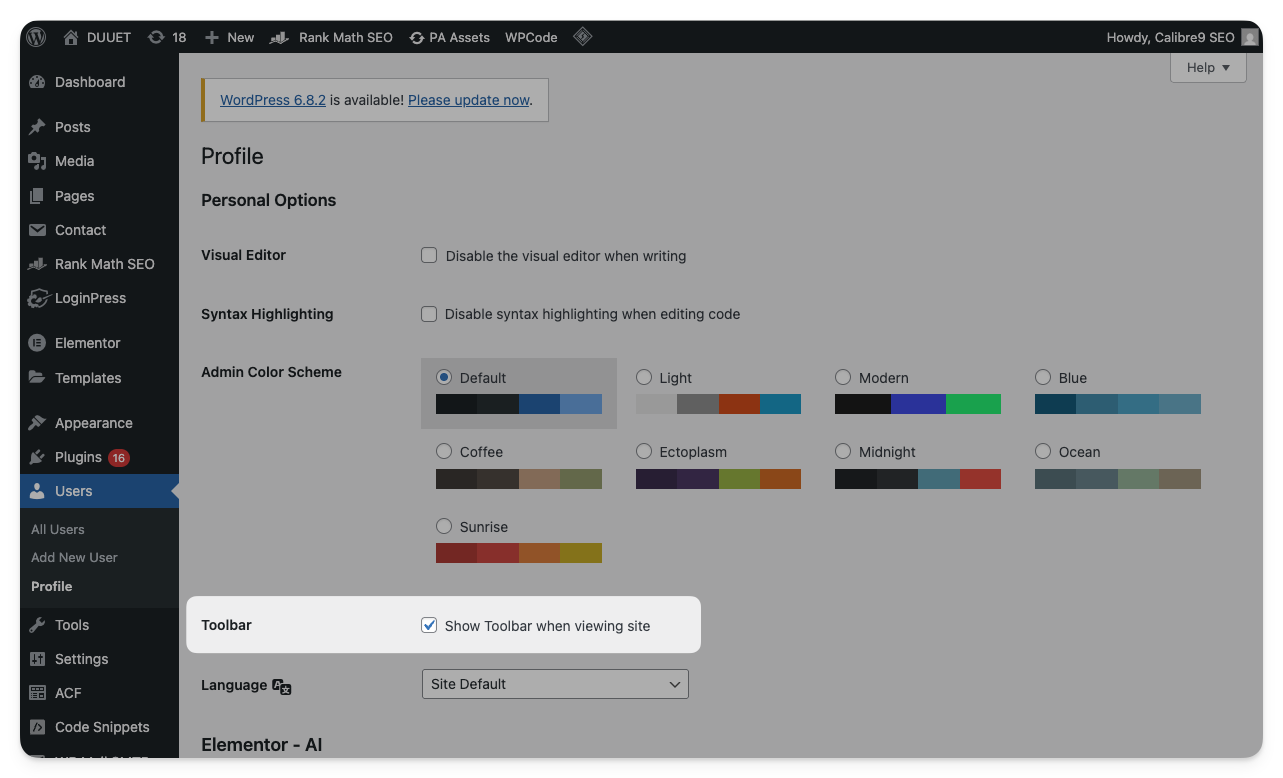
Admin Toolbar | Often (particularly when making content changes), it’s easier to go on to the page you want to edit and click the Edit Page button (instead of trying to find the page in the back end). 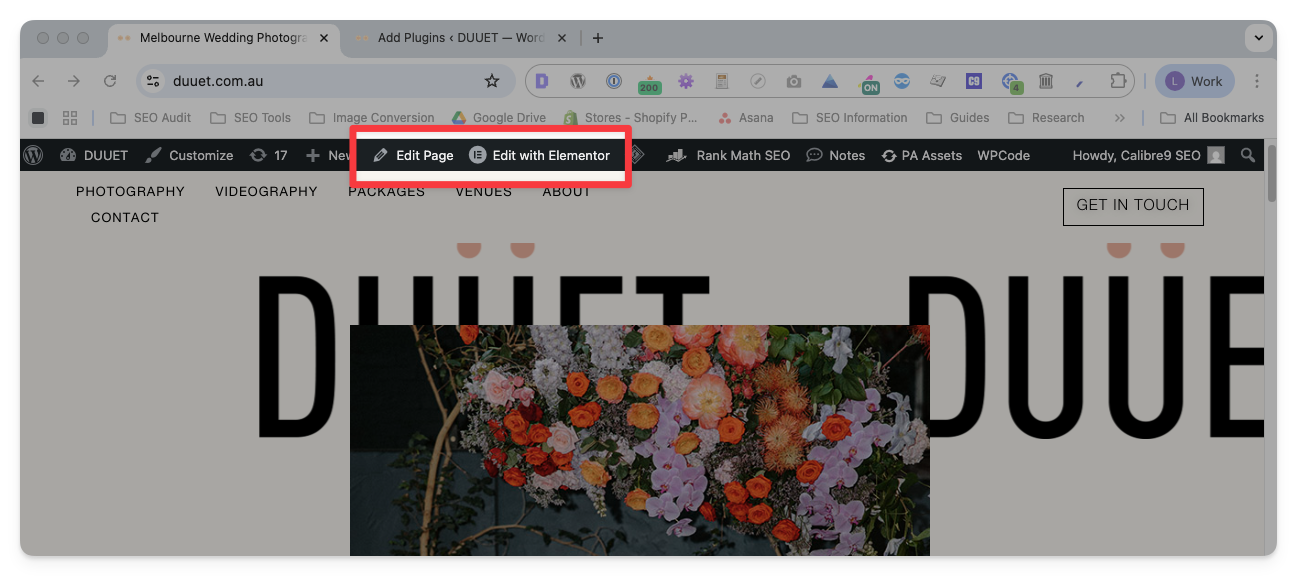 If you cannot see the toolbar while logged in:
Open the backend → Edit Profile (dropdown in top right) → Tick Show Toolbar when viewing site
|
| WordPress Fixes | |
Alt Text | To edit alt text: Go to Media (in the sidebar) → Select the correct image → Type in the Alternative Text box 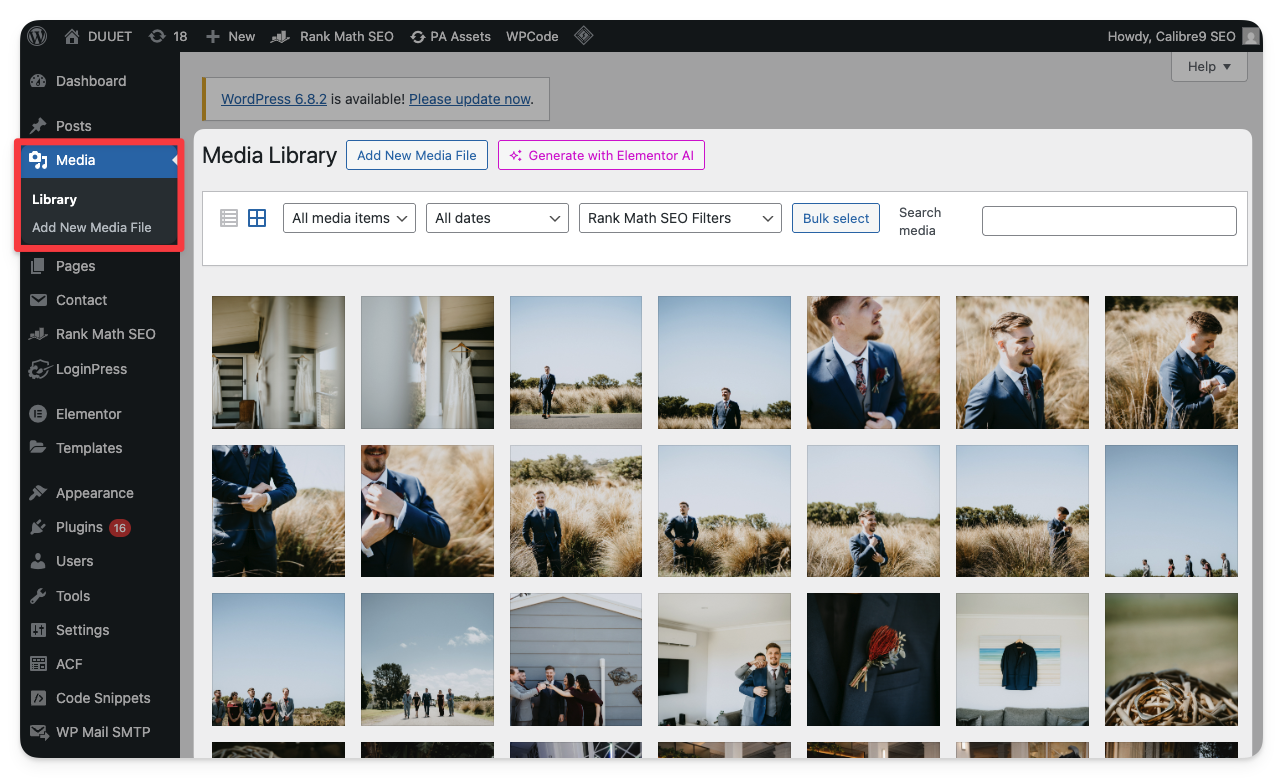 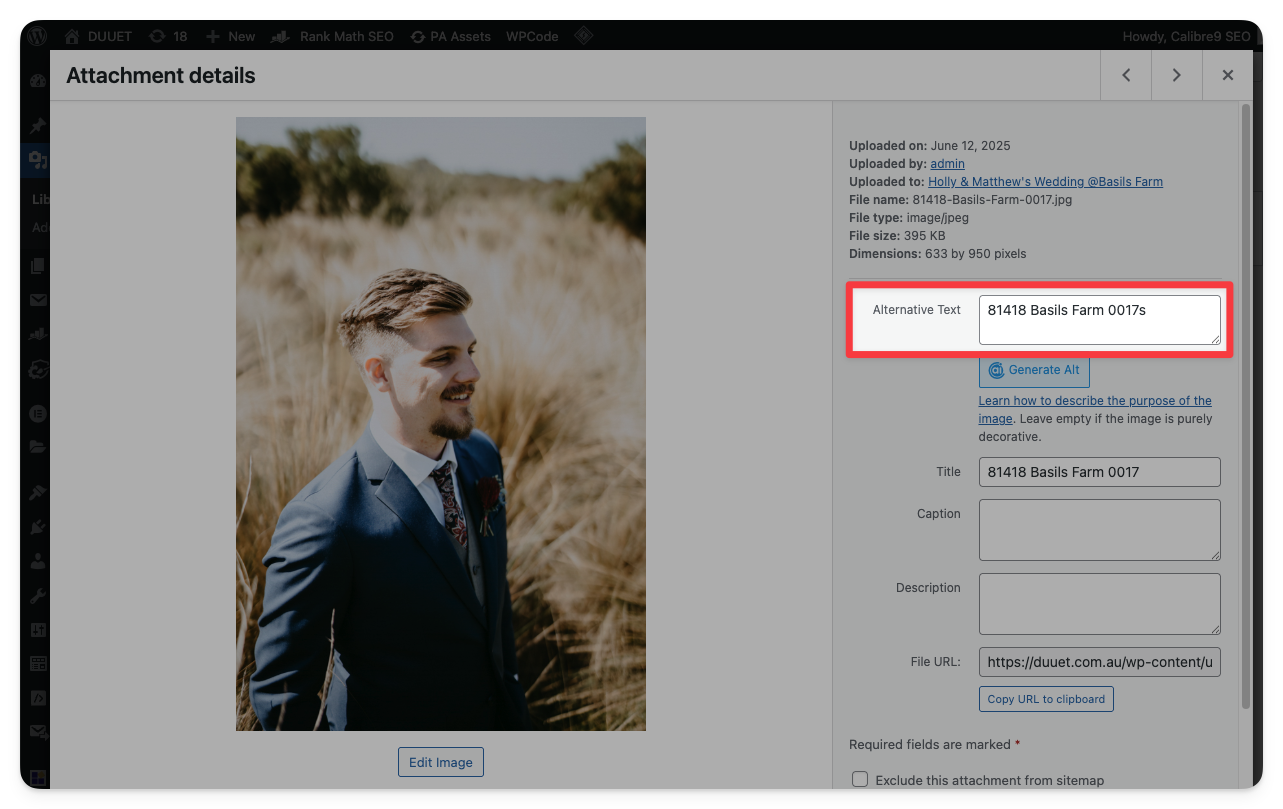 |
Article/Person Schemas | Article and person schemas are added automatically by Yoast (and most other SEO plugins). Ensure that Yoast is installed on the website. To change the author of an article:
Go to Posts → Select the correct post → Click Edit
→ Click on Screen Options (top right) → Ensure that Author is ticked → Scroll down on the page, and select the Author 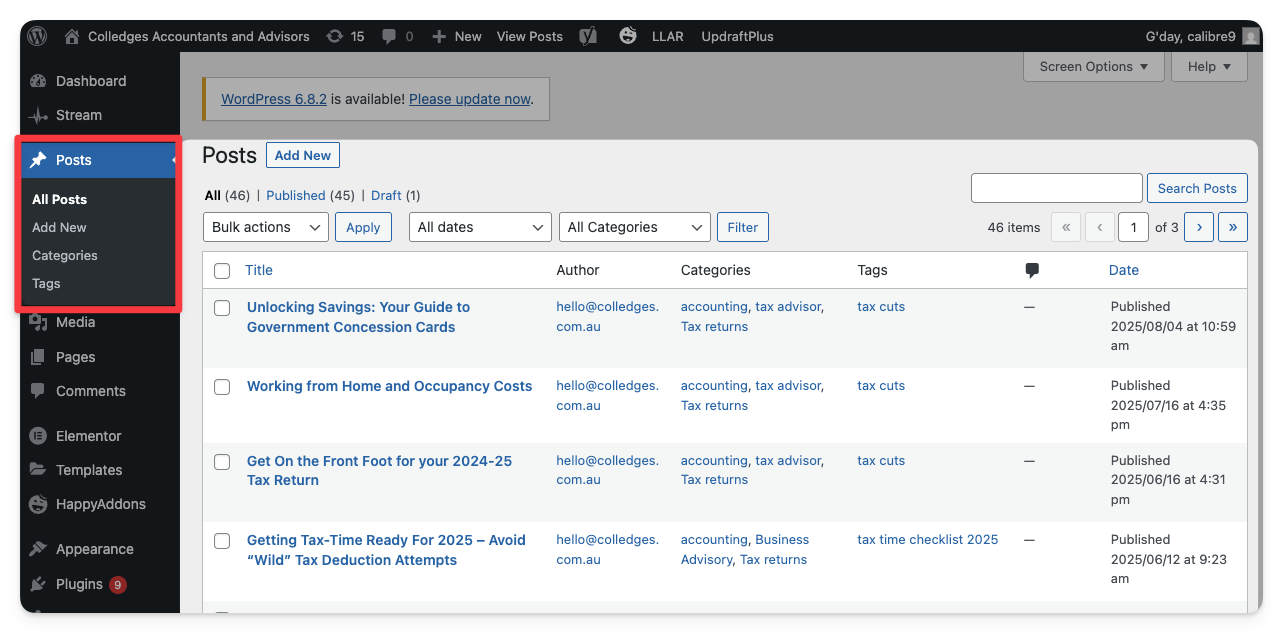   To change the display name of an author:
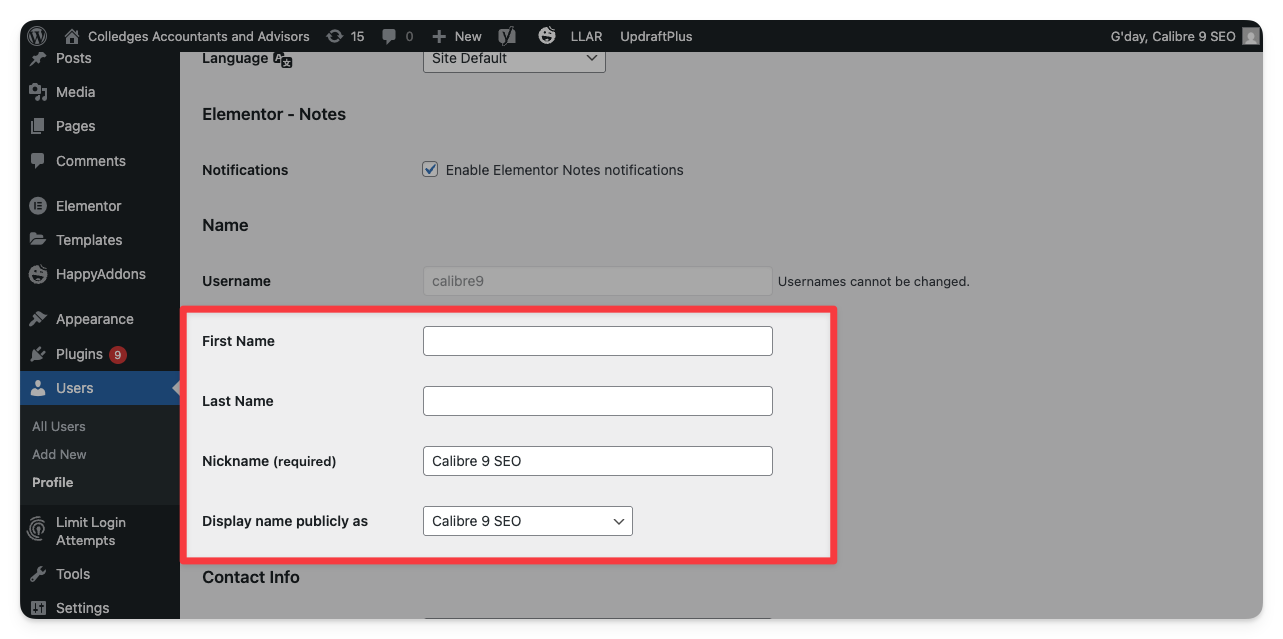
Go to Users → Find the correct user and click Edit
→ Change either their Name or Nickname
→ Use Display name publicly as to select the correct name. 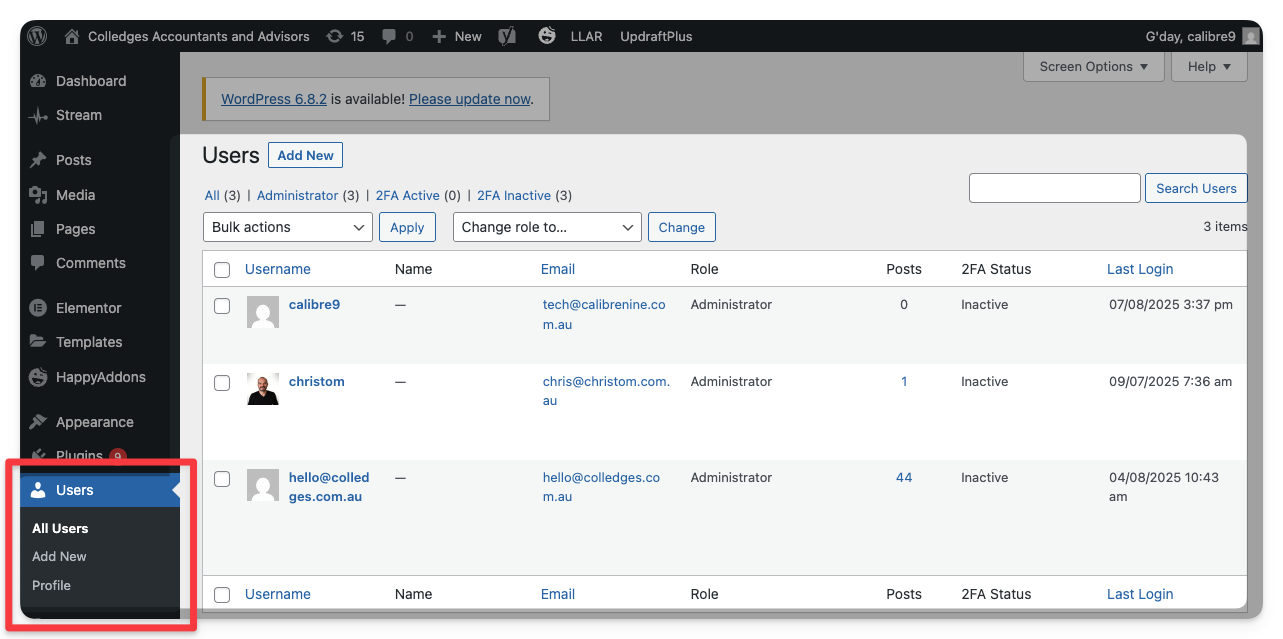
|
Canonicals | To change the canonical tag on a page:
Ensure that Yoast is installed on the website. → Go on the page and click Edit Page (or find through the backend by going to Pages in the sidebar) → Scroll down until you get to the Yoast settings → Open the Advanced dropdown → Enter the desired URL into the Canonical URL box → Click Update (top right) 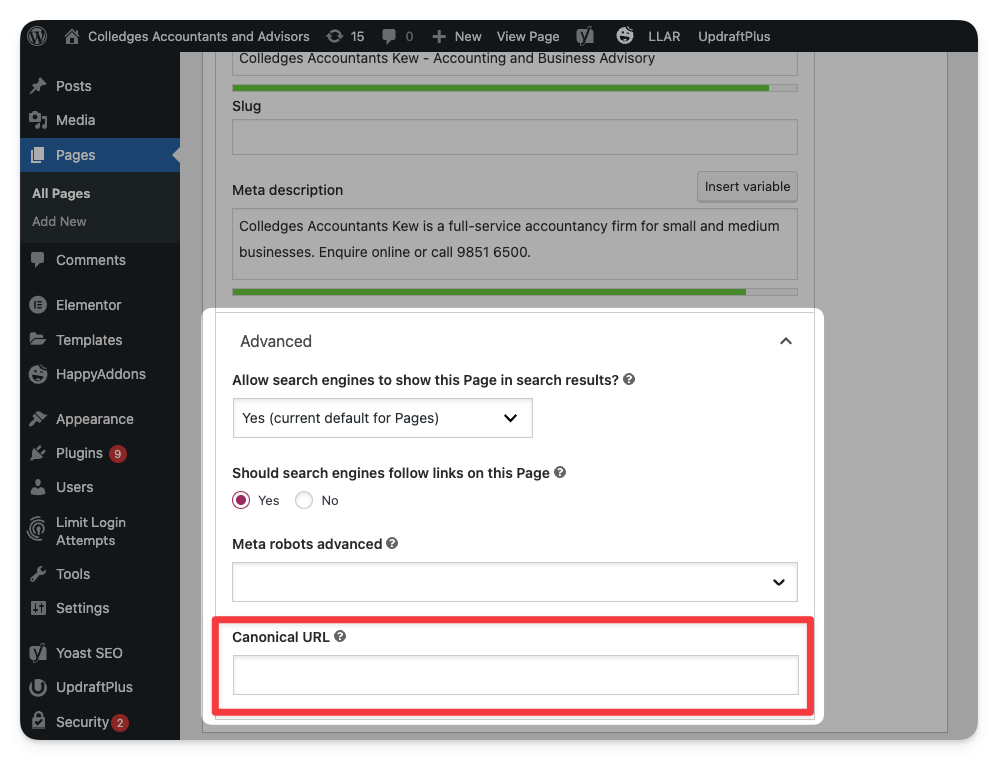 |
Content/Interlinking Changes | To make changes to a page on WordPress, ensure that you are using the correct page builder. Most pages will have an option in the toolbar (or in the backend) which says something like Edit with Elementor. All page builders work slightly differently, but changes made to body text and interlinking are usually very safe. Try to avoid changing colors or other styling/design elements, because you may affect all similar elements site-wide. If you have any issues, it’s usually best to look up the documentation for the specific page-builder that the client is using. |
Heading Tags | In WordPress, heading tags are usually edited through the page builder. Page builders vary in how they function, but usually you can click on the heading then edit the tags in a sidebar. 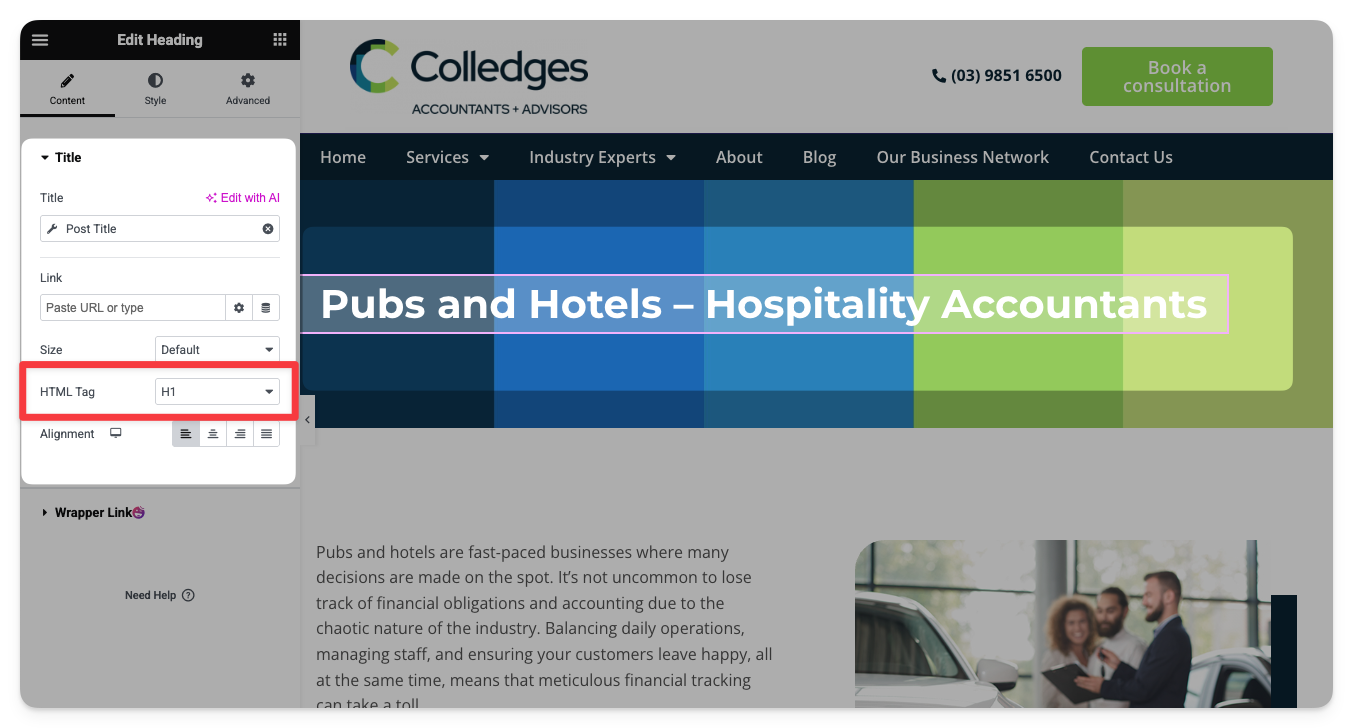 |
Hreflang | Hreflangs are reasonably easy to implement on WordPress websites, but they require an injection of code directly into the functions.php file. At the moment, I would recommend against doing this on your own – any syntax errors made during implementation will crash the entire WordPress installation, rendering you unable to fix the mistake. I know because I’ve done it to the Calibre9 website (brag). This is an example of the code I would usually use (taken from the Cattani website): |
.htaccess File | To edit your .htaccess file:
→ Ensure that Yoast is installed on the website. → Go to Yoast SEO then Tools (in the sidebar) → Click on File Editor
→ Make desired changes to the .htaccess file → Click on Save changes to .htaccess 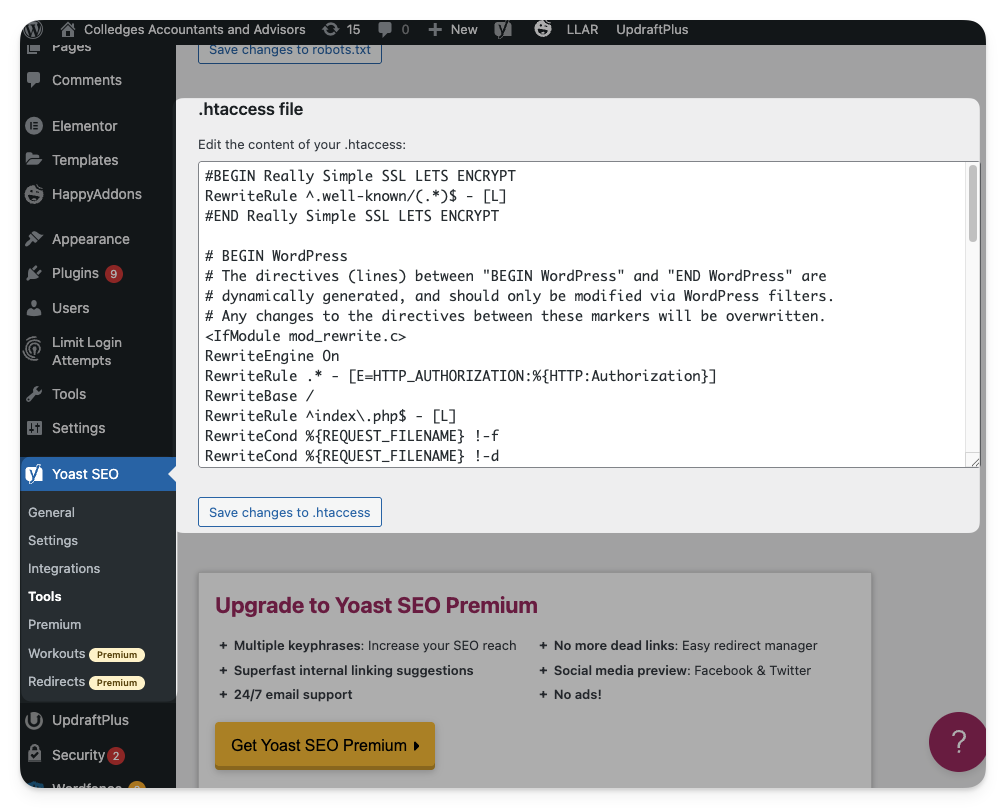 |
Local Business/Organization Schema | Video Guide: First, make a schema for the site using either a Schema Generator or Chat GPT. Schemas are annoying to get the syntax right on, so I recommend not doing it by hand. If you use ChatGPT, request it to “Make a JSONLD local business schema for a brand with these details A schema should usually include:
To add a local business or organization schema to a website: → Ensure that WP Code is installed on the website → Open WP Code (usually in the sidebar as Code Snippets, but sometimes listed under Settings as Header & Footer) → Go to the Header & Footer section → Paste the schema into the Header box → Click Save Changes 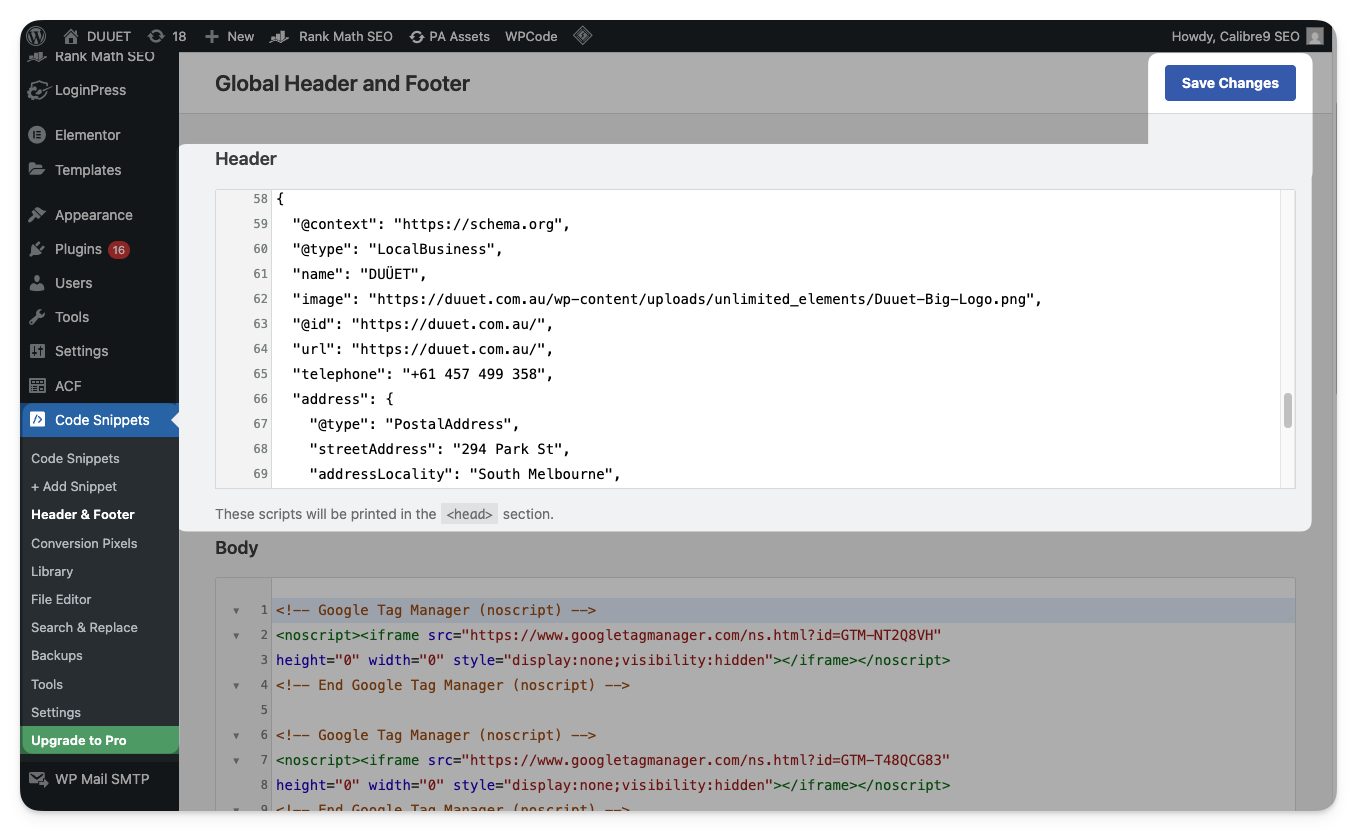 |
Meta Descriptions | To change the meta description on a page:
→ Ensure that Yoast is installed on the website. → Go on the page and click Edit Page (or find through the backend by going to Pages in the sidebar) → Scroll down and enter your desired description into the Meta description box → Click Update (top right) 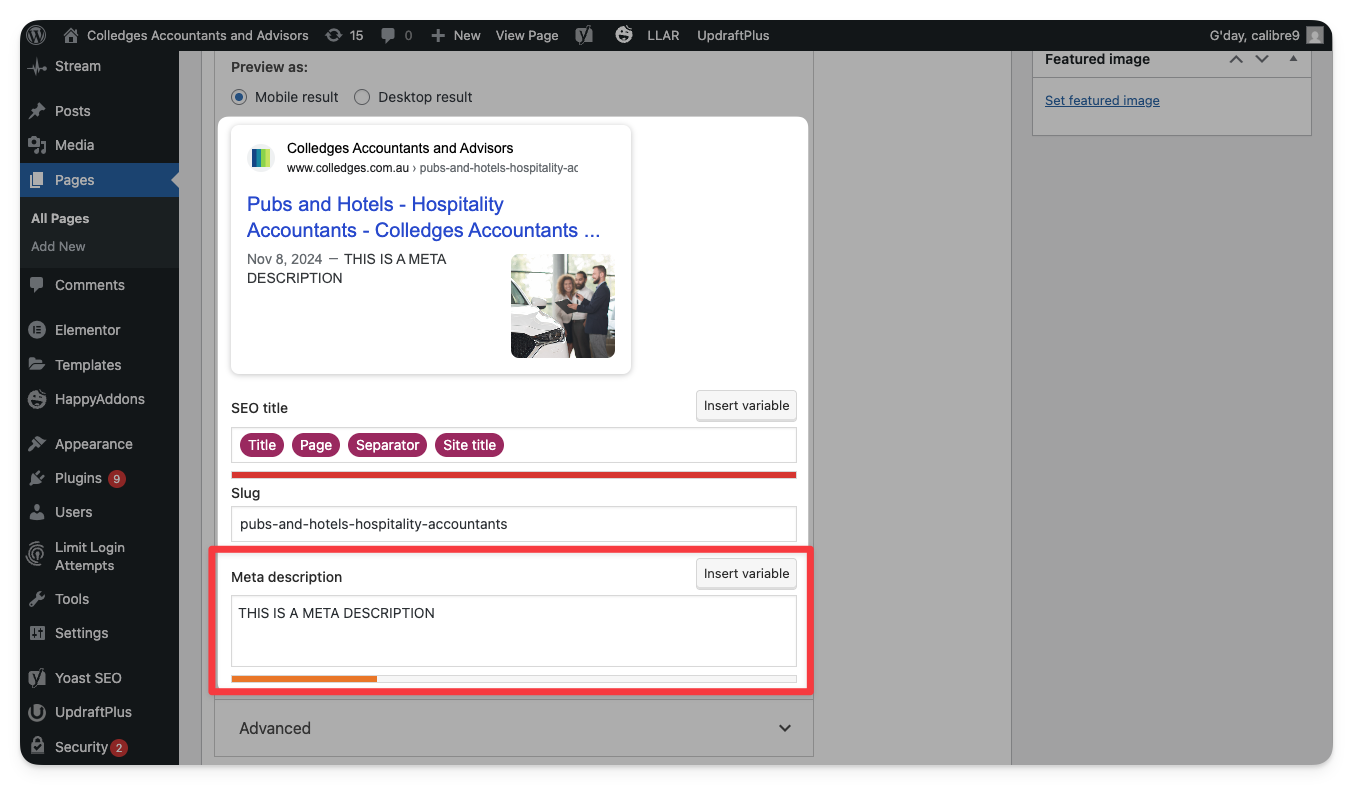 To template meta descriptions across all pages on a site:
→ Ensure that Yoast is installed on the website. → Go to Yoast SEO then Settings (in the sidebar) → Under Content types select the type of page you want to template for (Posts, Pages, Categories etc.) → Build the description template using the Insert variable button. → Click Save Changes 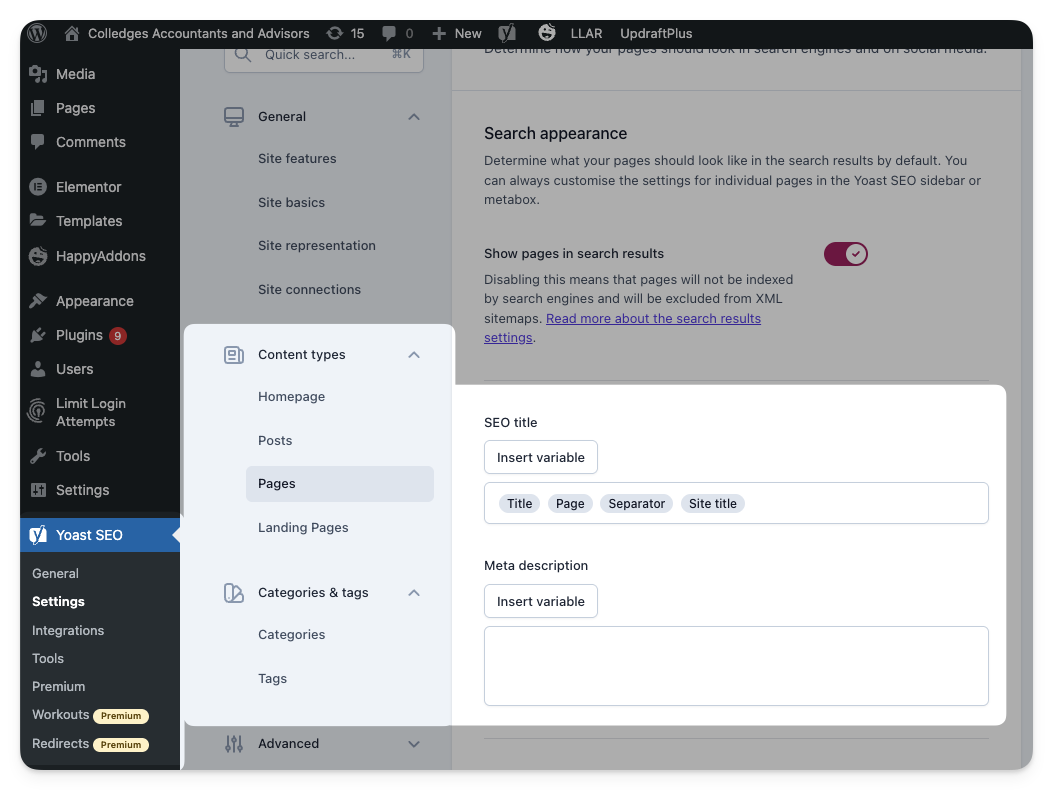 |
Metadata (Bulk) | Yoast cannot upload metadata in bulk. As a result we have built our own plugin to do so. It is called Optimizely, and you can download the zip here. Your new metadata will need to be in a CSV file. To install the plugin:
→ Download it from the link above → Go to Plugins then Add New (in the sidebar) → Click Upload Plugin → Drag and drop the Optimizely zip file → Click Install Now then Activate Plugin
To use the plugin:
→ Click on Optimizely
→ Click on Choose file
→ Choose the CSV with the metadata changes → Click Upload (ignore all references to the Calibre API – they are out of date) To remove the plugin after use:
→ Go to Plugins (in the sidebar) → Find Optimizely and click Deactivate
→ Find Optimizely and click Delete
|
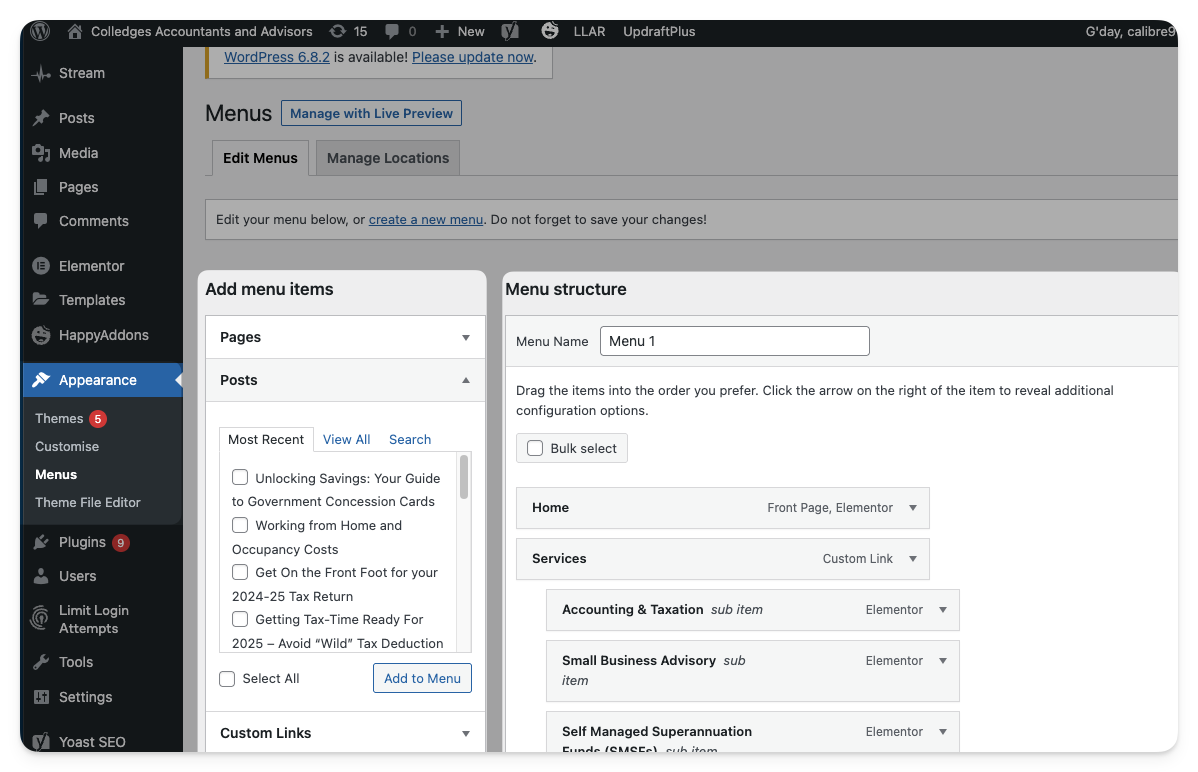
Navigation/Menu Changes | To edit the menu/navigation items:
→ Click on Appearance then Menus (in the sidebar) → Edit the menu as desired – you can use the left-hand column to add new items, and the right column to move, edit and delete items → Click Save Menu
 |
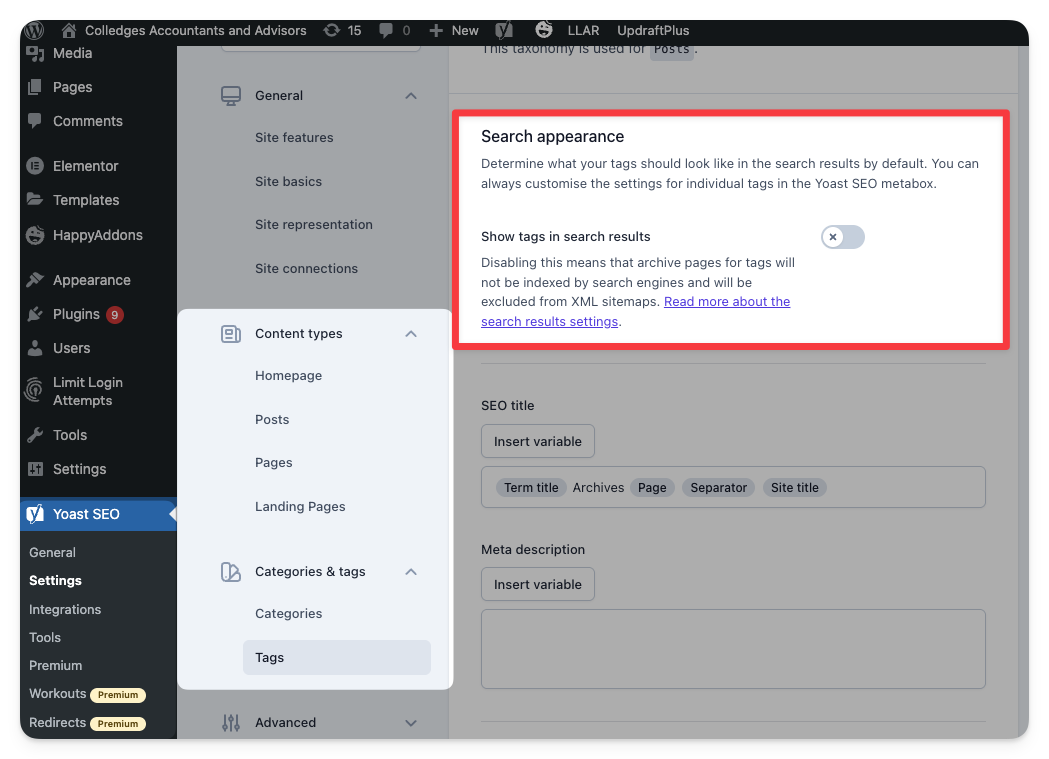
Noindex Directives | To change the the noindex tag on a page:
→ Ensure that Yoast is installed on the website. → Go on the page and click Edit Page (or find through the backend by going to Pages in the sidebar) → Scroll down until you get to the Yoast settings → Open the Advanced dropdown → Change the Allow search engines to show this Page in search results? dropdown to the desired setting. → Click Update (top right) 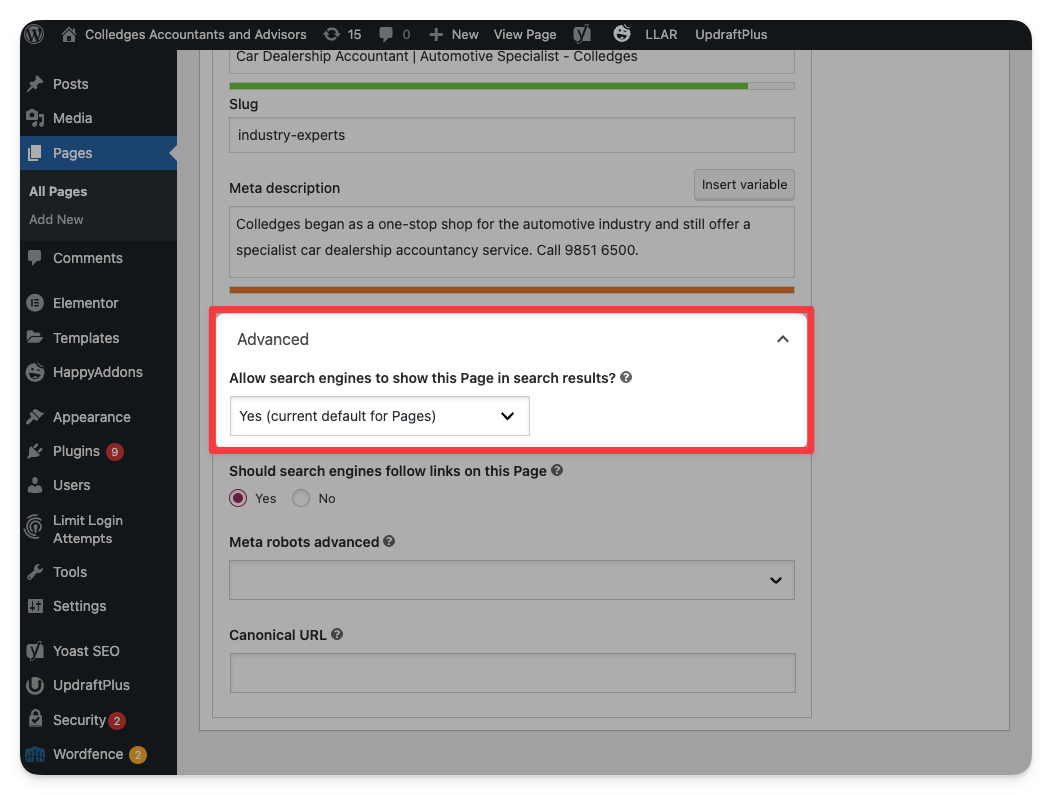 To change the noindex tags on a group of pages:
→ Ensure that Yoast is installed on the website. → Go to Yoast SEO then Settings (in the sidebar) → Under Content types select the type of page you want to template for (Posts, Pages, Categories etc.) → Change the switch next to Show (page type) in search results
→ Click Save Changes
|
Page Titles | To change the the page title on a page:
→ Ensure that Yoast is installed on the website. → Go on the page and click Edit Page (or find through the backend by going to Pages in the sidebar) → Scroll down until you get to the Yoast settings → Change the SEO title text box to the desired title. → Click Update (top right) 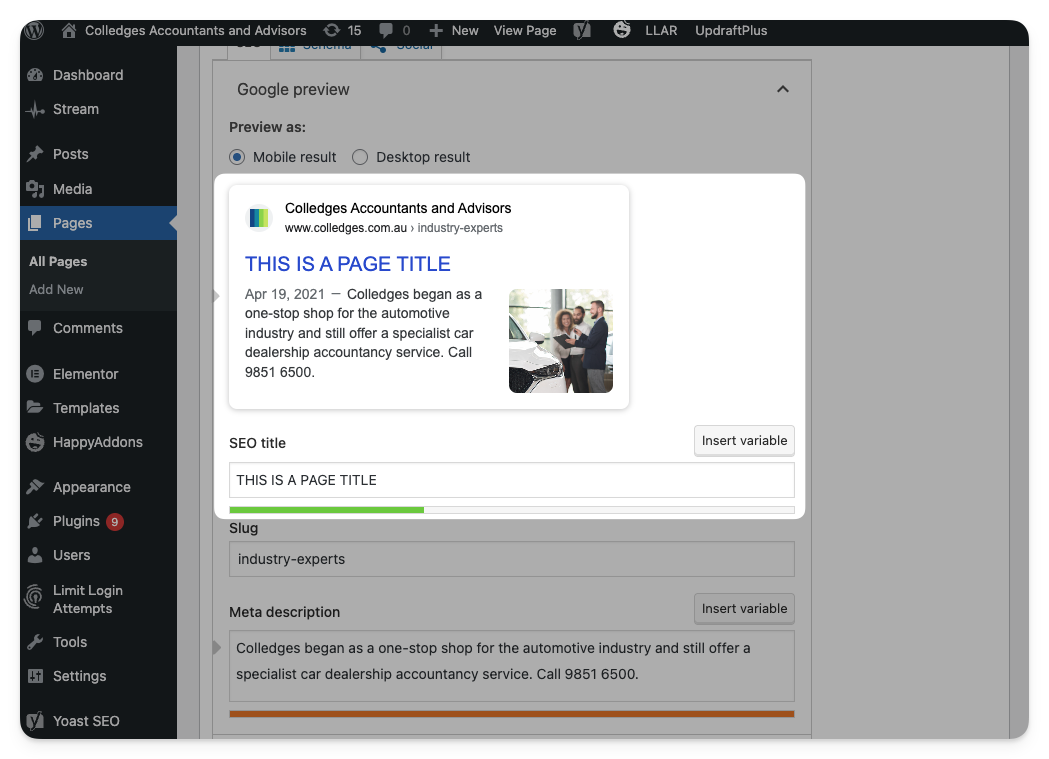 To template meta descriptions across all pages on a site:
→ Ensure that Yoast is installed on the website. → Go to Yoast SEO then Settings (in the sidebar) → Under Content types select the type of page you want to template for (Posts, Pages, Categories etc.) → Build the title template using the Insert variable button. → Click Save Changes  |
Product Schemas | Our WordPress sites are usually service-based. If you are working on a site that requires product schemas, I recommend switching from Yoast to All in One SEO. Usually the metadata is carried across without issues. All in One SEO has the additional feature that it adds product schemas to your WooCommerce products automatically. To edit the product schema settings:
→ Make sure the All in One SEO plugin is installed → Go to All in One SEO then Search Appearance (in the sidebar) → Scroll down to Products then click Schema Markup |
Robots.txt | To edit your robots.txt file:
→ Ensure that Yoast is installed on the website. → Go to Yoast SEO then Tools (in the sidebar) → Click on File Editor
→ Make desired changes to the robot.txt file → Click on Save changes to robots.txt 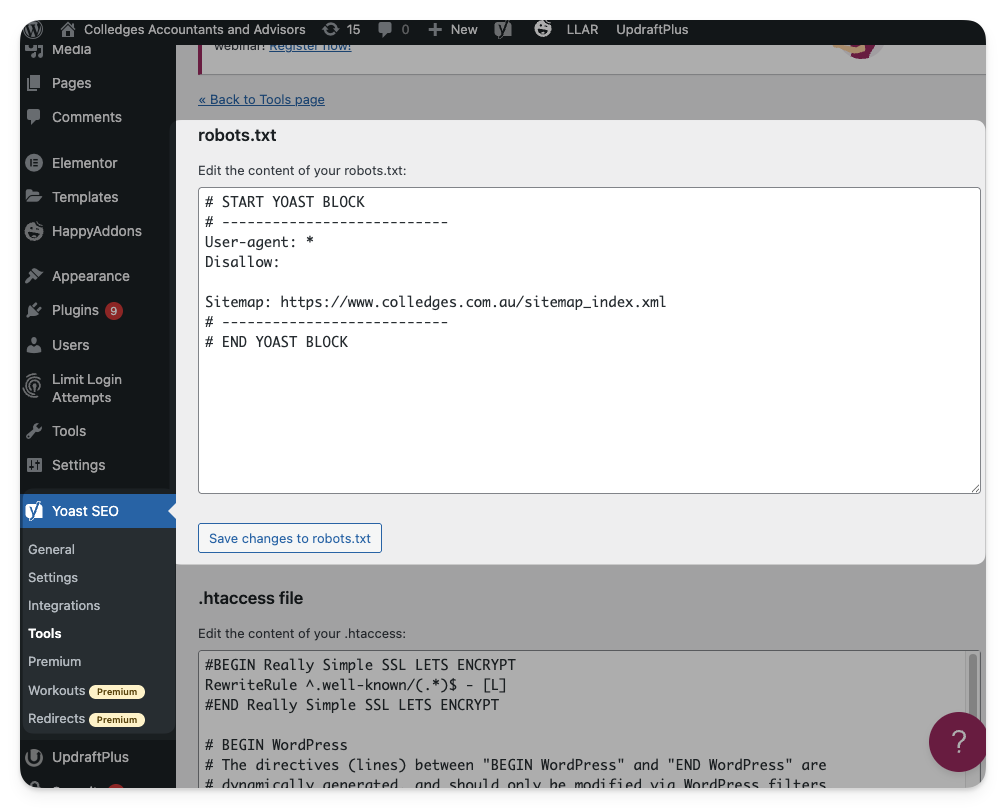
|
Redirections | To add redirections to the site:
→ Ensure that Redirection is installed on the website. → Go to Tools then Redirection (in the sidebar) → Click on Add New
→ Put the correct URLs in Source URL (redirect from) and Target URL (redirect to) → Click on Add Redirect 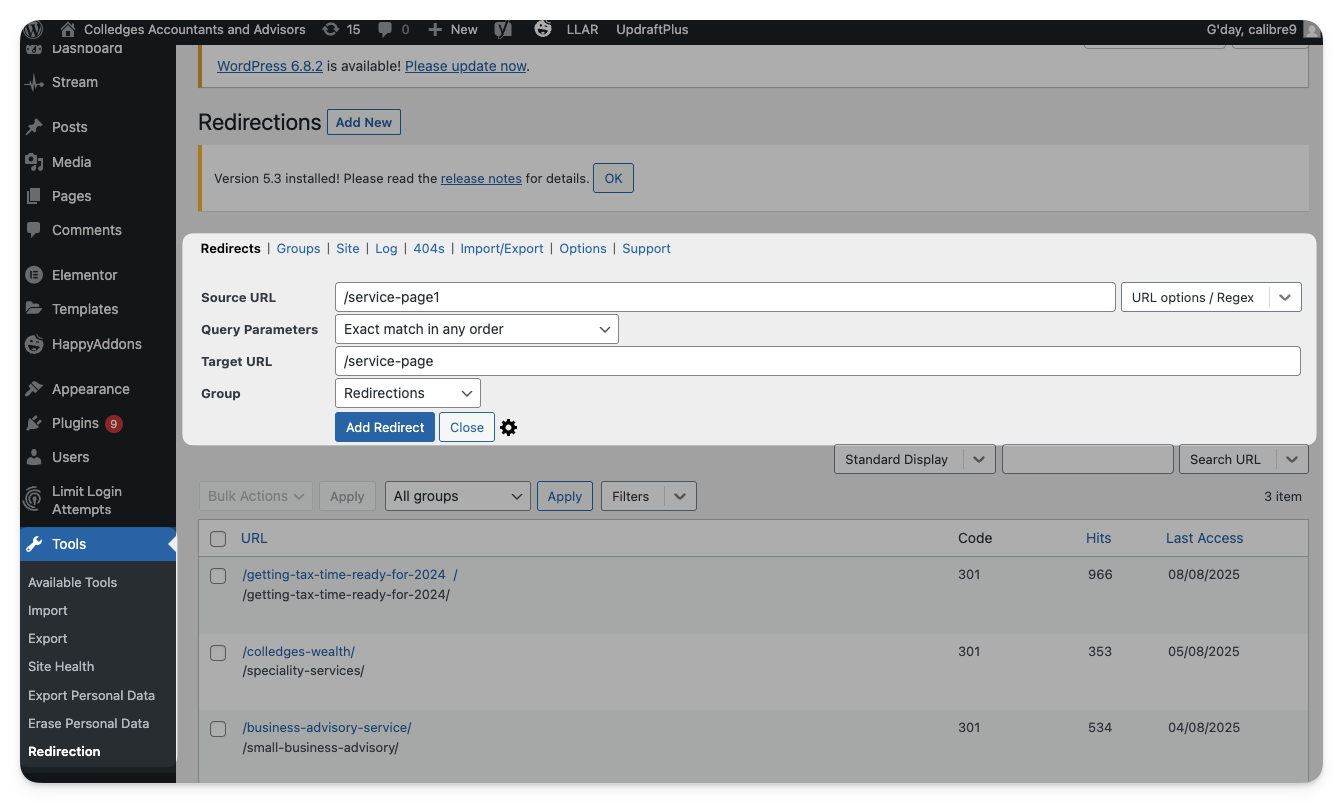 |
Redirections (Bulk) | To add bulk redirections to the site:
→ Ensure that Redirection is installed on the website. → Go to Tools then Redirection (in the sidebar) → Click on Import/Export
→ Drag and drop a csv file containing the redirects → Click Upload 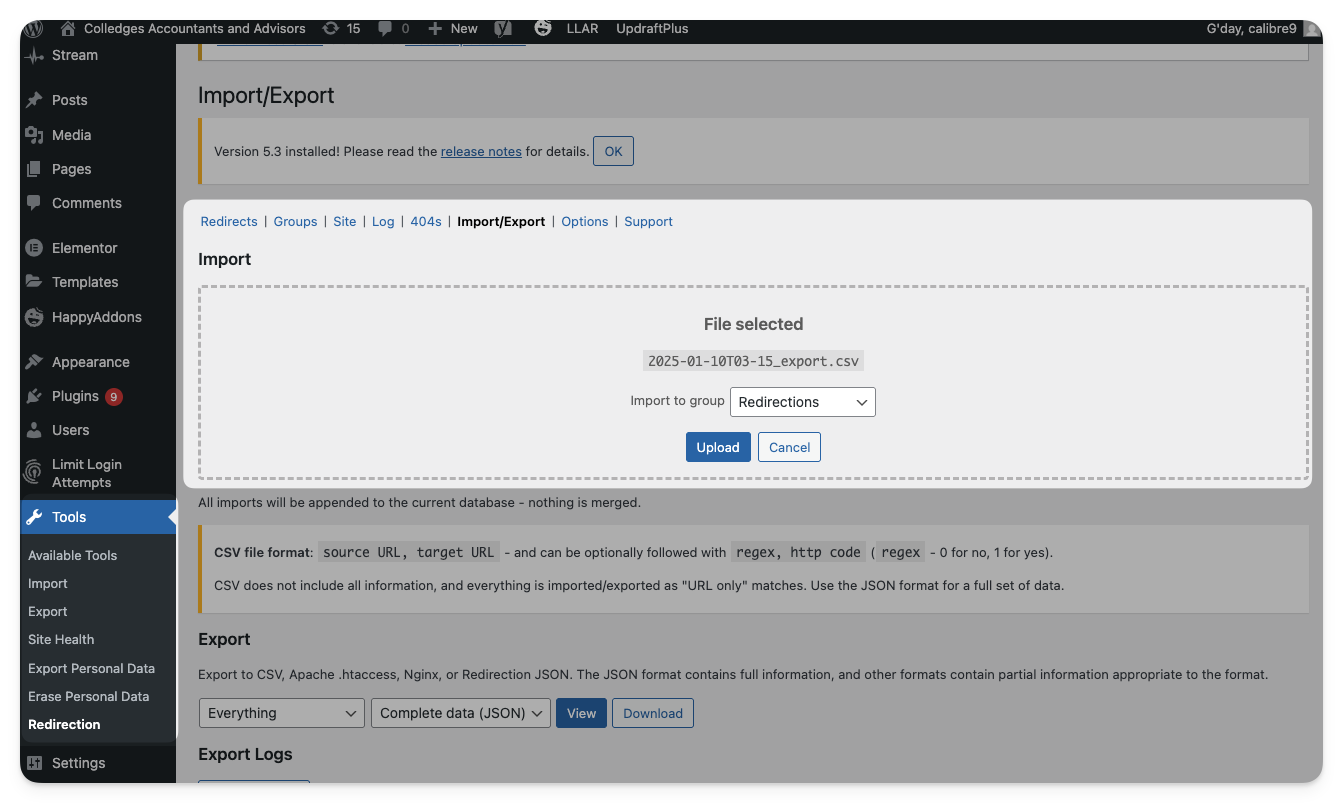 |
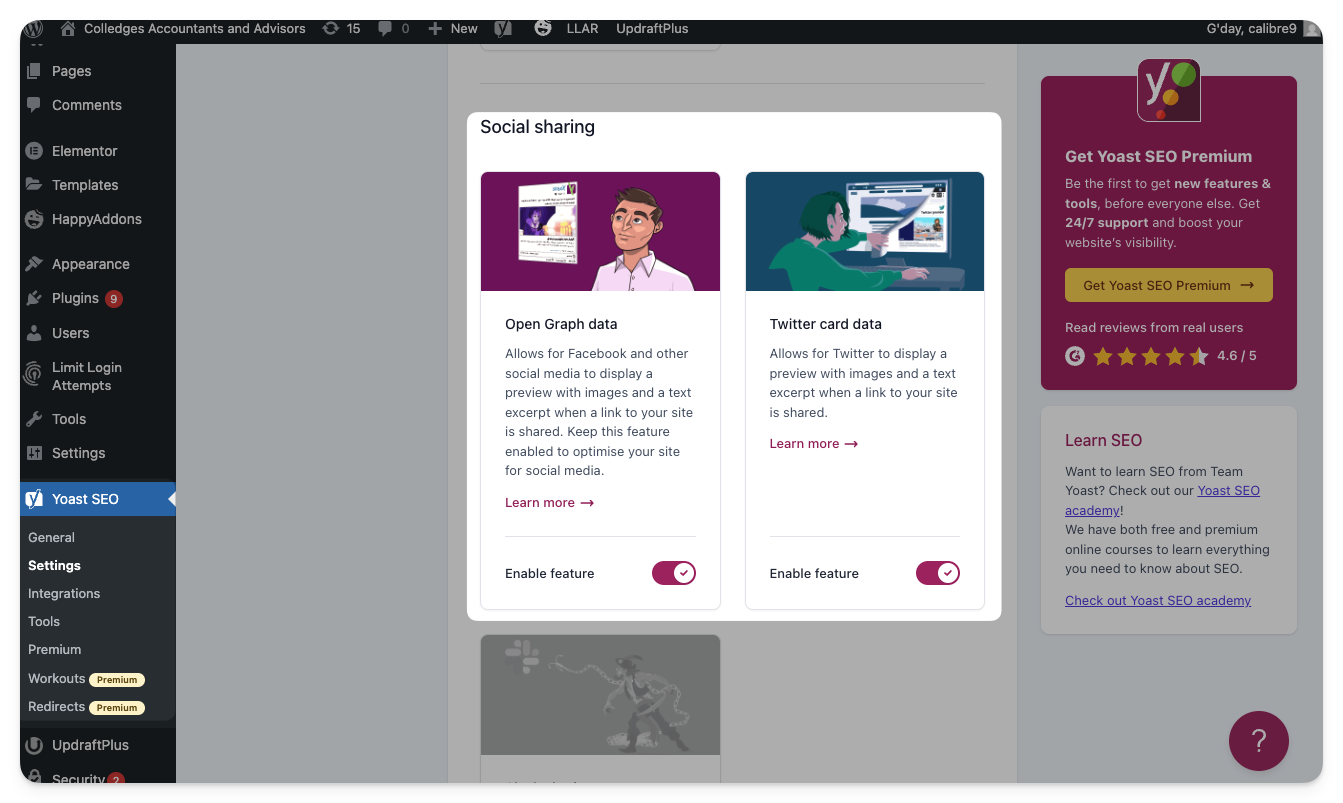
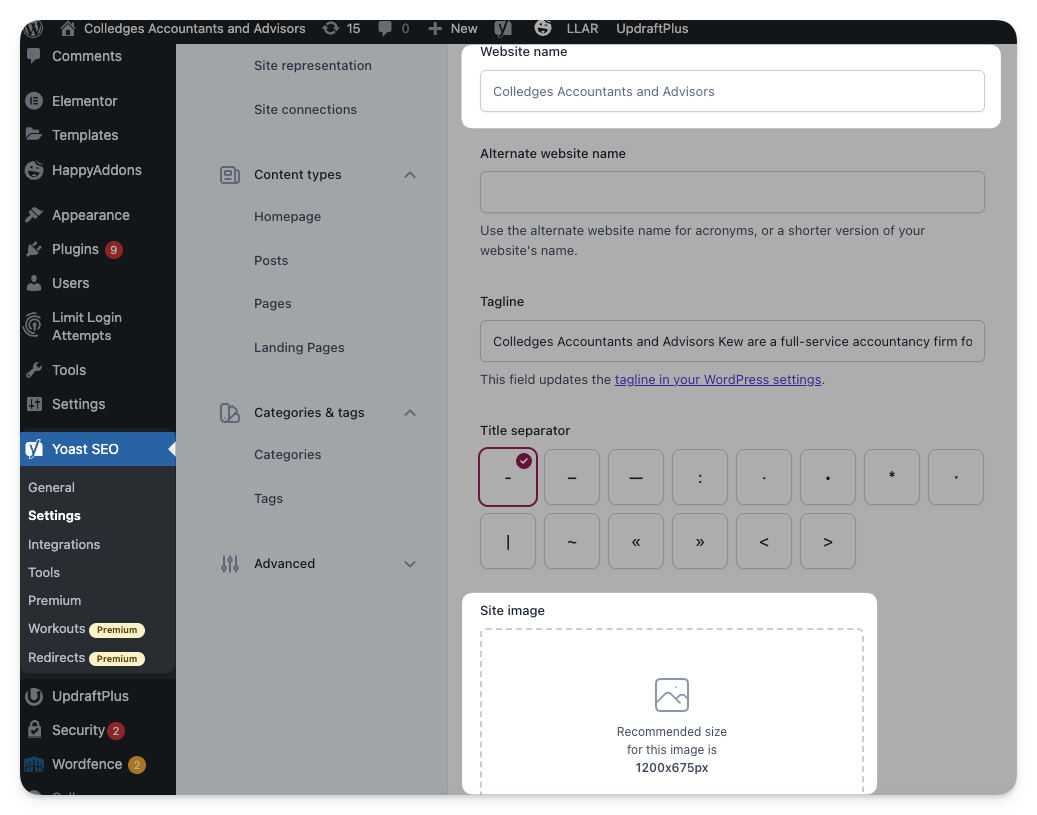
Social Media/Open Graph Tags | To edit your Open Graph tags (Facebook, LinkedIn, Instagram etc): → Ensure that Yoast is installed on the website. → Go to Yoast SEO then Settings (in the sidebar) → Scroll down and make sure the switch for Open Graph data is turned on → Click Save Changes
→ Scroll back up and click on Site basics (within Yoast) → Change the Website name and Site Image
→ Click Save Changes
  |
Tracking Setup | To set up tracking on a wordpress site, see the Tracking Setup Guide:
|
URL Path Change | To change an entire URL pathway:
→ Go to Settings then Permalinks (in the sidebar) → Make the desired changes to the URL pathways → Click Save Changes
→ Make a redirect from the old URLs to the new URLs
|
URL Slug Change | To change the the page title on a page:
→ Ensure that Yoast is installed on the website. → Go on the page and click Edit Page (or find through the backend by going to Pages in the sidebar) → Scroll down until you get to the Yoast settings → Change the Slug text box to the desired slug. → Click Update (top right) → Make a redirect from the old URL to the new URL 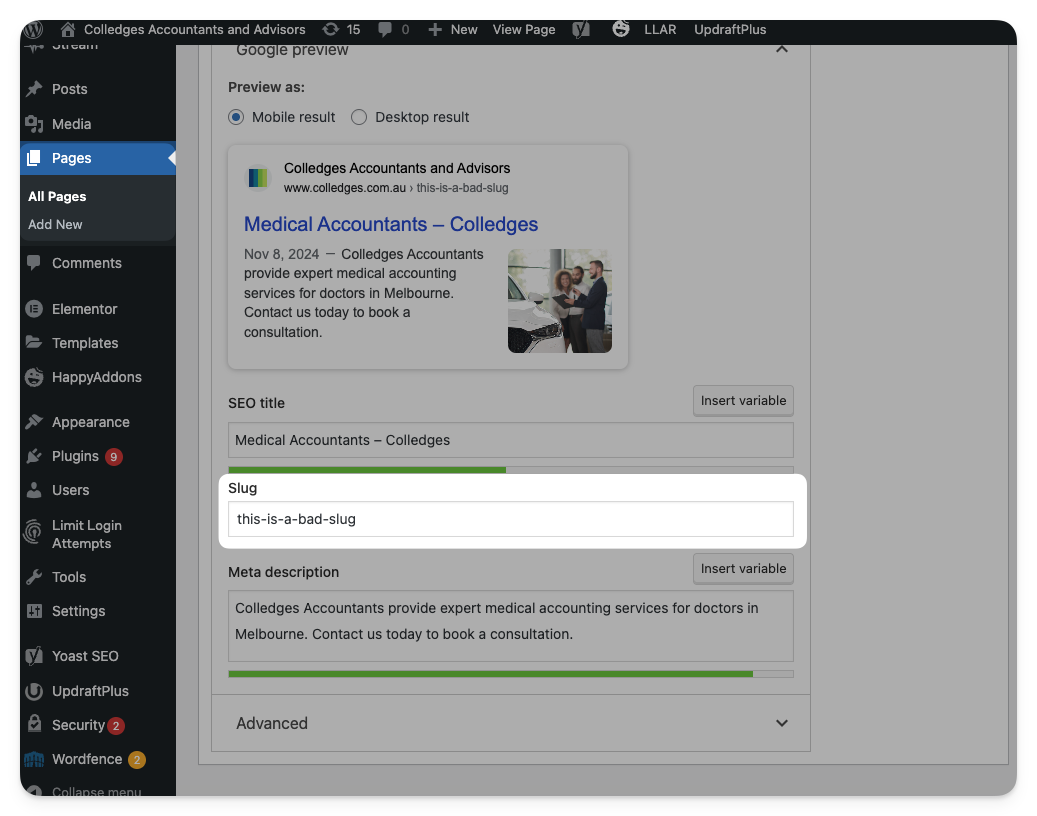 |
XML Sitemap | XML sitemaps are automatically added and maintained by Yoast. If the sitemap is missing:
→ Ensure that Yoast is installed on the website. → Go to Yoast SEO then Settings (in the sidebar) → Scroll down and make sure the switch for XML Sitemaps is turned on → Click Save Changes 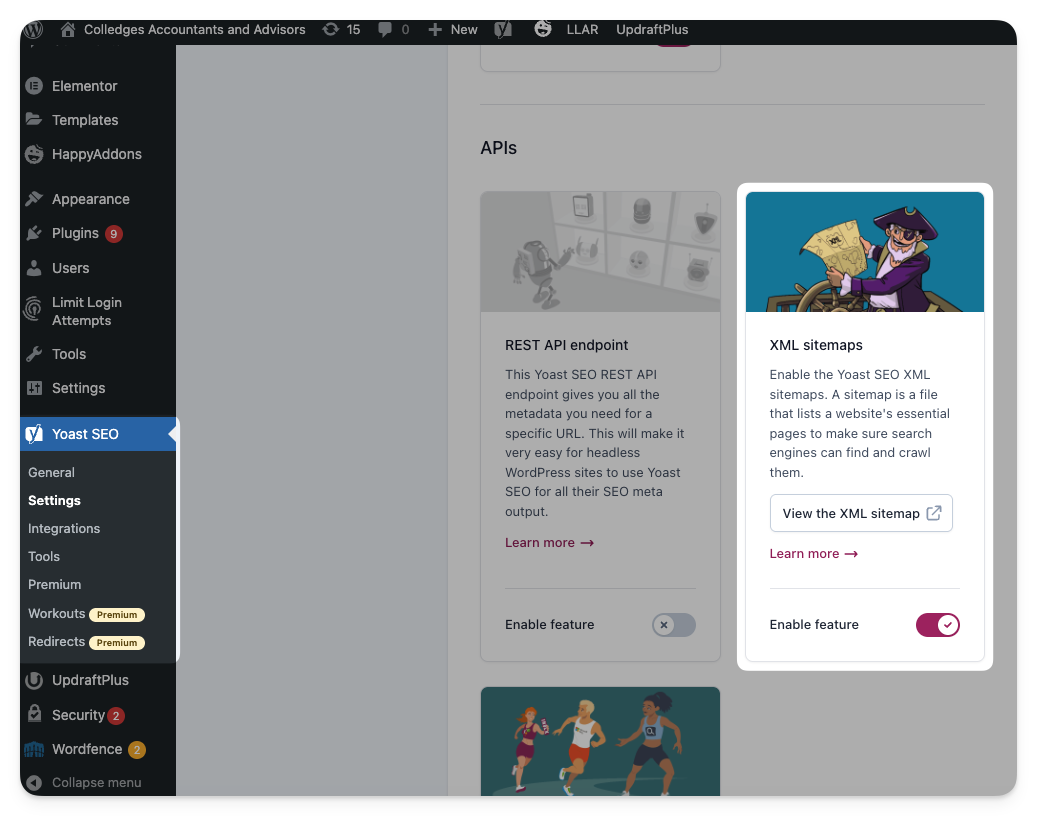 If the sitemap is out of date/missing pages:
→ Follow the same steps as above, turn the sitemap off then Save changes
→ Turn the sitemap back on then Save changes again |
Categories:
Documentation
Processes